Astro B.yond: Satellite Signal

Astro has 2 satellites positioned in roughly the same place about 37,ooo KM up in space,  they are Measat 3 & Measat 3a. They are so close to each other that we only need to point one dish in the right direction to get signal from both satellites. The satellites are kind of partitioned into groups called transponders and each transponder might have anything from 5 to 14 channels on it.

Monitoring the Satellite Signal

There is a bit of confusion with some people believing that they can increase the satellite signal strength by changing the “entry point” inside the Satellite Settings menu.

Home>Settings>Installation Settings>PIN “0000”>Satellite Settings>OK>OK

Above is an example of the monitored signal strength I’m receiving on transponder “18 MEASAT 3A(VH)”.That is all it is, it’s just a monitor of the signal from that one transponder (in this case on Measat 3A).

If you go back and change the entry point to 1 MEASAT  3(VL) and you notice a different signal strength all it means is that the signal received from that transponder is different to the other one.
To get the best signal

Let the installer do it.

For those DIY people out there you are not only risking your lives crawling around on roofs and up ladders but you may also be doing more harm then good to the signal.

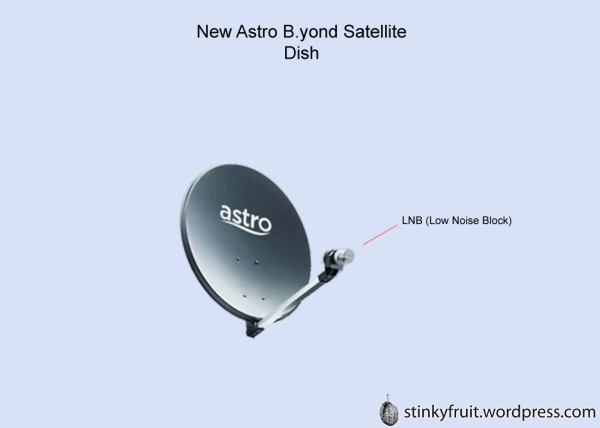
Therefore make sure that you use the new dish and LNB. Connecting to the old dish and LNB will give you a reduced signal and will not change rain fade issues.

The cable from the LNB to the decoder must not be split. You will potentially lose all signal to a second decoder it you split the cable plus you will reduce the signal going to the first decoder.

Keep the cable run from the LNB to the decoder to the minimum. Long cable runs introduce complications that can lower the signal strength.

Make sure that the line of sight of the dish is uninterrupted by tress and buildings and don’t hang anything on the dish or the LNB.

On a clear day with a correctly set up dish you should get a signal level higher then 220.

Rain Fade

It’s pretty much gone now! Rain fade is what we call it when we lose signal when it rains. The increase in signal received and processed with the new dish and LNB means that you will survive through all but the heaviest rain falls.

BTW Rain fade will never totally be removed but it can be minimized & also it affects all satellite broadcasters not just astro.

We’ve minimized it by using a new dish which is larger at 65cm hence it is receiving more signal and the new design LNB is processing more.

Some tech trivia

Astro LNB’s are “Universal LNB” meaning they can receive signal sent from our satellites either in a horizontal or vertical polarities.

A larger dish would increase signal strength but there are regulations preventing us from using them.

Currently all Astro channels are located on the Vertical poles of Measat 3 and Measat 3a.

Currently all Astro HD channels are beaming from Measat 3a.

You can track Measat 3 & 3a online

Click here for Measat 3

Click here for Measat 3a

They are in a geosynchronous orbit hence their position in the sky doesn’t change much, they kind of wobble around a bit but nothing huge. if you want to see something moving up there try following the ISS Click here for International Space Station

Add to FacebookAdd to DiggAdd to Del.icio.usAdd to StumbleuponAdd to RedditAdd to BlinklistAdd to TwitterAdd to TechnoratiAdd to Yahoo BuzzAdd to Newsvine

Astro B.yond: ESPN HD

I go away for 4 days and we launched a new channel! ESPN HD (ch #832) Just watched Serena Williams in HD win the Aussie Open, I wish Maria Sharapova was in the final, that’s someone I’d like to see HD.

Anyway, I noticed a few people on the Lowyat forum mentioning that to get ESPN HD you need to put your decoder into standby. It’s understandable to think you need to do this as this is the procedure on the old decoders but on the Astro B.yond box you don’t need to do anything at all. Once our Broadcast guys turn the channel on it automatically opens on your decoder.

When a new channel launches it appear on the EPG.

Add to FacebookAdd to DiggAdd to Del.icio.usAdd to StumbleuponAdd to RedditAdd to BlinklistAdd to TwitterAdd to TechnoratiAdd to Yahoo BuzzAdd to Newsvine

Astro B.yond: HDMI and Dolby 5.1

Sorry, I was wrong.

I  said the B.yond decoder doesn’t send 5.1 over HDMI. This is not true, it does…whether you can receive this is a different matter.

Setting the Audio to “Dolby 5.1 (digital only)” and using HDMI

Chances are that if you connected B.yond via HDMI to your TV and select “Dolby 5.1 (digital only)” on the decoder you will not hear  audio on our HD channels that have a programme in Dolby 5.1.

Why? because most TV’s do not have 5.1 capabillities or the ability to do a down-mix of  5.1 to stereo.  Instead they do a Dolby Pass Through via HDMI, Digital Audio Coax or Optical leads to a receiver that is Dolby friendly such as a home theatre system.

The following is from our Technician Sheikh when I asked him for some clarification.

“The term “Dolby Down-mix” is the ability to play Dolby 5.1 (in this case) through a 2 speaker system. Although the Dolby effects are lost in a 2 speaker system, the advantage of this setup (or equipment) is that a system that can perform Dolby down-mix would not require a 5.1 speaker system. This is also an advantage for headphone and earphone users or people who like low level listening (ie watching movies in the wee hours of the morning).”

The B.yond  Dolby audio out of the decoder is not down mixed.  If your TV set has a Dolby down-mix option set your B.yond decoder to Dolby 5.1. & your TV will be able to play both Dolby or stereo on any service.  If  you are in the same boat as most TV owners and your TV can’t Dolby down-mix then set your B.yond decoder to “Stereo” if only connecting the decoder to the TV.

Your TV manual should be able to tell you if your TV does Dolby down mix or Dolby Pass Through.

Advanced Connections

If you are connecting to a Home Theatres, HDMI Switcher, Amp etc you still may have to use a Digital Coax connection to get 5.1. This is due to how the HDMI is switched between your equipment and also compatibility of devices and HDCP (High-Bandwidth Digital Content Protection- copy protection system used with  HDMI) .  Some Home Theatres and Amps act as switchers and some do not. You will need to consult the user manual of your system to find out about this.

A last word from Sheikh

“The main importance in acquiring equipment would be to determine whether the system is HDMI 1.3 and HDCP compliant .
When something is not right, this is where the issue of ‘copy protection’ occurs on the TV. This can be due to a multitude of reasons, the primary reason may be due to compliance (in the case of cheap HDMI splitters), electrical handshakes (equipment connecting to one another) , software handshakes (equipment negotiations between one another ) , cables affecting the data and signal , etc..
Troubleshooting HDCP is not something straightforward due to this complexity.”

Add to FacebookAdd to DiggAdd to Del.icio.usAdd to StumbleuponAdd to RedditAdd to BlinklistAdd to TwitterAdd to TechnoratiAdd to Yahoo BuzzAdd to Newsvine

Astro B.yond: Software updates & rebooting

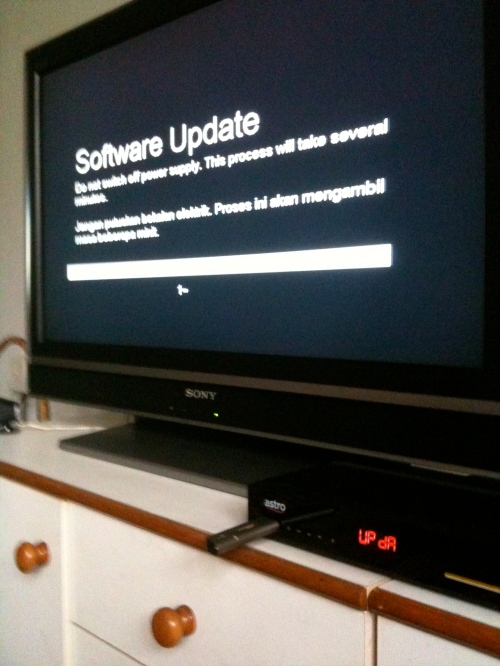
Once every 5 minutes we send a signal to all the B.yond decoders which lets them know what the latest software version is. Your decoder can only act upon this signal if it receives it while in standby mode,  so when you aren’t watching anything be sure to put your decoder in standby. The LED panel of the B.yond decoder displays the time when it is in standby.

All you need to do to update  your software is to put the decoder into standby mode and wait. It will do everything for you. Once the process  finishes the time will return to the display on the decoder and you can now turn the decoder on.

Software updates

If you turn the decoder to standby every night you will be ensuring that you are running the latest software version.

Software updates get released to fix bugs and enable new features. You can only get an update if you put the decoder in standby mode and wait till it receives our blast telling it to update. This could be up to 5 minutes.

Once the decoder receives the blast it can take another 5 minutes to run through the updating process. You know when it is finished this process once the time displays on the LED on the B.yond decoder.

An example of a bug fixed by letting the decoder do a software update is the “Copy Protection Failed” error message appearing on some peoples TV’s. This was an HDCP issue that we have corrected.

NB:We will be releasing version notes on our website shortly so you can track what is happening on our software updates

Rebooting

It hasn’t happened to me yet but if your box hangs you can reboot it by simply turning the power off at the wall socket, wait a few seconds and power on again.

Its important to note that a reboot is not a software update. Leave your decoder in standby after turning the power on and if it needs to it will perform the software update as described above.

Add to FacebookAdd to DiggAdd to Del.icio.usAdd to StumbleuponAdd to RedditAdd to BlinklistAdd to TwitterAdd to TechnoratiAdd to Yahoo BuzzAdd to Newsvine

Apple TV, nice little toy if you can find it

After the installer had done his job I wanted to do a bit more of an advance set up to take advantage of my Home Theatre system and programme my new Astro B.yond remote control to sync to my system.

Here is what I did but take note it is not going to be the same for all models and connecting between different brands might have specific issues that I don’t mention here.

Connecting

As you will be connecting devices with HDMI cables it is best to turn the power off to all devices before connecting anything.

Read the instructions of your TV and Home Theatre to make sure you connect correctly. Follow their guide and then turn the power back on to the devices. When you turn the power back on the HDMI system will do a “handshake” between devices linking them together and this is the first part off syncing your system completed.

I have a Sony Bravia 32″ TV and a Sony Home Theatre system (DAV-IS50).

For my system I needed to do the following

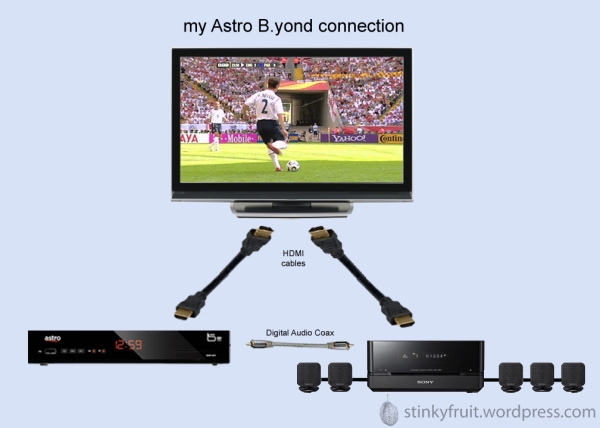
  1. B.yond decoder to TV with HDMI cable (HDMI1 slot on TV)
  2. TV (HDMI2 slot) to Home Theatre with HDMI cable. This connection is going to allow me to control the TV plus the Home Theatre with the B.yond remote control)
  3. To receive Dolby 5.1 lastly I connect the B.yond decoder to Home Theatre SAT/CABLE slot with Digital Audio Coax.

NB: nothing is to scale in the picture, the B.yond box is much smaller

In most cases simply connecting the system is not enough you need to now config your TV and Home Theatre. On my Sony system this is pretty painful as their system menus are really poorly designed. If you have lost your user manual then I would recommend getting on-line and downloading it before doing this.

Sony Home Theatre settings

HDMI Control: ON

Digital IN: TV →OPT, SAT/CABLE →COAX (if not using a digital audio cable choose the other option)

Sony TV Settings

HDMI Control: ON

Auto Devices OFF: ON

Auto TV ON: ON

STB Syncro: ON

After all this I follow the Sony Home Theatre user guide to programme the remote control of the Home Theatre to work the TV.

Astro B.yond Settings

All the video settings will be set already but if you want to change them read the user guide.

I’m using a Digital Audio Coax so that I can get my Dolby 5.1 therefore I need to make sure that I set the decoder correctly.

On the Astro B.yond decoder you can navigate to the Audio Settings this way

Home>Settings>Your Settings>Digital Audio Settings

Set the Digital Audio Output to “Dolby Digital 5.1 (Digital Only)”

NB: if you are not using Digital Audio Coax you must set this to “Stereo” or you will hear no audio on HD channels. Also note that you will not may not get Dolby 5.1 unless you use the Digital Audio coax. We do not send Dolby 5.1 over the HDMI cable. CORRECTION We do send Dolby 5.1 over HDMI but if your TV can not mix down the signal or your Home Theatre can not swtich the HDMI correctly you will not recieve any audio when a programme is broadcast in 5.1, more info .

Now my connections and system settings are done. Next step is getting rid of all these remote controls I have.

Using the Astro B.yond remote control to work your TV & Home Theatre

I’ve still got 3 remote controls sitting next to me after all this (Home Theatre, TV & Astro B.yond) and I can’t control the volume with my B.yond remote. This is normal that the volume can’t be adjustable on the B.yond box as it is a digital audio signal. You can only control the volume of the decoder after you have programmed the B.yond remote control. If you don’t do this step you can only control volume by using the TV or Home Theatre remote control.

The instructions to programme the remote are in the manual, be sure to select the correct code for your TV brand.

For my Sony set up I did the following on the B.yond remote control.

Press “OK” and “TV” till the light on the remote blinks twice.

Enter my code 1825 (this is only going to work on Sony brands you need to check the user manual for your code). The light on the remote will blink twice if you are successful.

Now the remote is synced to the system but it is only controlling the volume on the decoder not the Home Theatre so I need to do one last step.

Press “OK” and “vol +” until the remote blinks twice.

Now the Astro B.yond remote control will work the Home Theatre’s volume, mute & power plus the TV’s input selector and power.

What happens if you have other systems or have run out of HDMI ports?

You need to understand the basics of your connection & set up, I can’t over say this, READ THE MANUAL. There are correct and incorrect ways to cabling and system set-ups to all systems. Most Home Theatre manuals should have a section on connecting an STB (Set Top Box, ie a decoder in this case) and they will give you detailed info on HDMI control functions.

If you are out of HDMI ports then using an HDMI splitter switcher box will work. It is recommended to connect B.yond to the splitter and then to the TV and Home Theatre in this situation.

Got any questions or have any suggestions of other topics drop me a line in the comments section.

Cheers

Add to FacebookAdd to DiggAdd to Del.icio.usAdd to StumbleuponAdd to RedditAdd to BlinklistAdd to TwitterAdd to TechnoratiAdd to Yahoo BuzzAdd to Newsvine

Astro B.yond: Keeping the Secret

I can now brag about this, on October the 10th 2009 I became the first person in Malaysia to have the Astro B.yond HD decoder installed…and I had to keep it secret!

BTW my installer had a van not a submarine.

I was and still am a beta tester of the new box and I work for Astro but I wasn’t expecting to be the first person to get it! Not even the Chief Technology Officer, the man that had championed the entire project, had even had the box installed in his house yet (he got it the next day). He called me up on that day to ask how it was I said “awesome!”.

That 1st day I sat at home and watched National Geographic HD with Dolby 5.1 and I was the only person watching. Wow all that money just for me, well for a day anyway! We had no other channel then Nat Geo HD to view back then but I never got bored of the detail that we were broadcasting. I have a scheduling and promo back ground so I was well impressed with the Nat Geo channel ID promos and the “look” of the channel. Nat Geo have always been great at channel branding and to see them do it in HD is brilliant.

A side from HD what really sets this new B.yond decoder apart from anything we’ve done before is the navigation of the EPG. Our old ugly and slow thing is gone and now a new cool looking, easy to use and hyper fast one is here. In fact it is so fast we had to slow it down from the default setting as we found too many of us were so use to the old decoders speed that we double hit buttons all the time. Even now I see some comments on line from people doing the same, believe me you’ll get use to the speed in a couple of days and won’t be able to handle ever going back to an old box.

Another thing that was amazing was how nothing leaked about this project until we released it to the press! Everyone knows that TMnet is doing an IPTV release and they should have already launched by now according to the first reports. It goes without saying the IPTV will do HD we never knew that we would beat them to it. Frankly I hope they do launch soon, nothing benefits the customer more then competition and while we might have the satellite rights that doesn’t mean you can’t deliver a pay TV service over other means. Anyway enough of that

So I’ll blog some things about the new B.yond box over the next days . I’ll share experiences and give tips and pointers.

In the mean time check out the website

http://www.astro.com.my/byond/index.asp

Add to FacebookAdd to DiggAdd to Del.icio.usAdd to StumbleuponAdd to RedditAdd to BlinklistAdd to TwitterAdd to TechnoratiAdd to Yahoo BuzzAdd to Newsvine

Why do we have Black Bars on our TV screens?

Here’s the dilemma, not all TV broadcaster actually broadcast a wide screen image, many are still only broadcasting a picture compatible to the standard TV screen size. So what happens when these guys buy a new programme or receive a satellite feed that is full wide screen. How do they get it ready for broadcast, what do they do and why?

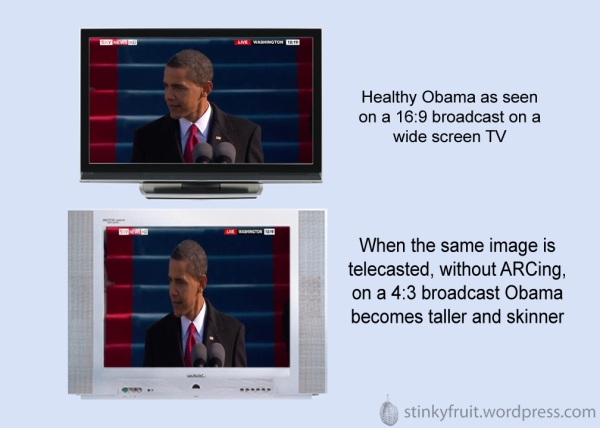
They ARC it. ARC stands for Aspect Ratio Conversion and aspect ratio is the width to height ratio of a TV. Your standard TV set is 4:3 and a wide screen TV is 16:9. If they simply broadcast the image with out ARCing first it will distort the image and it looks dreadful, everything becomes tall and thin.

obama

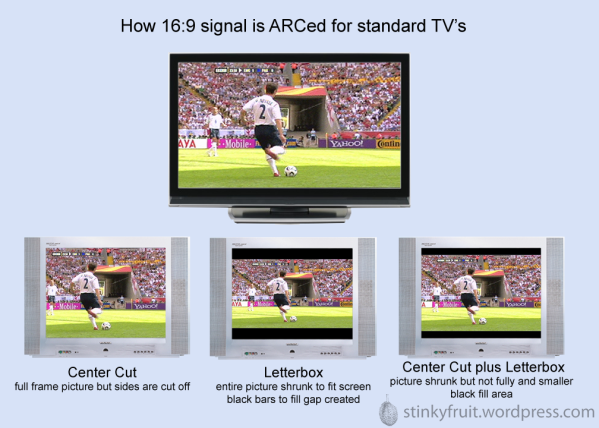
Most broadcasters choose one of 3 ARCing options. All have pros and cons. Here are the 3 choices

1. Center Cut

The sides are removed and only the center image is shown.

Pros: Full frame Picture and the most commonly used method.

Cons: If the content is not made specifically for TV then titles and parts of the action could fall off the sides of the screen. All programmes made for TV have a center area called the “4:3 safe zone”. This zone is an area where all essential action and graphics must sit regardless if it is a wide screen production or not. This safe zone is used specifically so that when a programme is center cut only non essential image is lost

Movies almost always are shot in a wider then 16:9 aspect ratio and many do not follow a safe zone (although it is becoming increasingly common for them to do so now-a-days as the DVD market is still strong) so when they are ARCed during the transfer to tape or file sometimes a method called “pan and scan” is used. Pan and scan is rarely performed by the broadcaster but instead by the production house doing the transfer so I won’t go over that. Google it for more info.

2. Letterbox

Shrinks the entire 16:9 image down and aligns the image in the middle of the 4:3 screen.

Pros: None of the original image is lost.

Cons: Black bars on the top and bottom of the screen and a smaller picture.

3. Center Cut + Letterbox

A bit of both, designed to allow a wider graphic safe zone during the production of the programme but has major issue when the content is sold on to another broadcaster.

Pros: A wider picture image is shown and it has a wider graphic safe zone

Cons: Black bars on the top and bottom of the screen and a smaller picture but not as small as 100% letterboxing.

It is a nice compromise at first thought but the major draw back is that the programme can never be broadcast on a 4:3 signal without ever seeing black bars on the screen. That is amazingly silly thing to do! Why limit that possibility? Why in this day and age must we ever see black bars, no matter how small they are, on a 4:3 TV screen? The only time in the past this has ever happened is when watching a western movie filmed in panovision, it makes no sense that it happens on made for TV programmes.

ARCing 16:9

S0 what happens when you watch this 4:3 broadcast on a wide-screen TV?

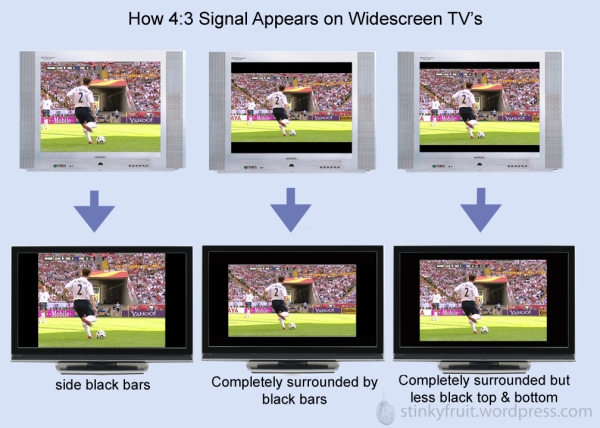
When a wide-screen TV is set correctly to receive a 4:3 broadcast there will always be black bars down the side of screen. This is called the Pillar Box

4-3 on widescreen

So unless the signal is a center cut you will have black bars all around the image. This is known as a “postage stamp” effect. It is a waste of TV screen space. Of course the viewer can change their TV to stretch or fill the image to full screen.

Add to FacebookAdd to DiggAdd to Del.icio.usAdd to StumbleuponAdd to RedditAdd to BlinklistAdd to TwitterAdd to TechnoratiAdd to Yahoo BuzzAdd to Newsvine